Ta
Armour build
-
Luke1978
- Patrol Leader
- Posts: 60
- Joined: Mon Aug 05, 2013 10:32 am
- Location: Cottingham, East Yorkshire
Re: Armour build
Thanks. Its mainly the backpack/toilet seat and the grill for the helmet im hesitant on when cutting, looked through cylon-knights build for some help so will try again tonight. Not too sure on where the other resin section goes in the helmet too, I know the first one goes in the section to be cut out but the second one confuses me a bit (will post a pic later if I can). As for the chroming - not yet  ive had several quotes or 'no we dont do that' but need to find one thats a bit easier on the budget if possible. Still looking at the DIY kits but have read that they produce results that are not too shiny.
Ta
Ta
-
Red Eye

- Cylon Empire VIP & BYC.net Gallery Admin
- Posts: 4837
- Joined: Sat May 20, 2006 10:11 am
- Location: Germany
Re: Armour build
If you're looking for more information on the helmet, this is a must read: http://www.cylon-knight.com/helmet.htm
Hope you'd be able to find a chroming company soon. When contacting them, be sure to ask if they can chrome any plastic.
Hope you'd be able to find a chroming company soon. When contacting them, be sure to ask if they can chrome any plastic.
"There can be no survivors. So long as one human remains alive the Alliance is threatened."

-
Luke1978
- Patrol Leader
- Posts: 60
- Joined: Mon Aug 05, 2013 10:32 am
- Location: Cottingham, East Yorkshire
Re: Armour build
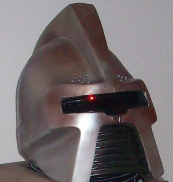
Right couple more hours in the garage - weathers crap so its quite cold. Trimmed the grill down some more but still not sure how much more to take off.
Put it back in the helmet and it seems to fit better but heres a few pics of it taped in - is this the right idea? Also should I trim the helmet back to the slightly indented line or leave some extra and trim more off as I go along?
Started trimming the chest and backpack down also. Left a bit of extra plastic past the indented guide line, will trim it again tomorrow.
Lastly the main section of the pack the guide lines don't seem to be even (see pencil lines) should they be? or is the pack meant to be slightly uneven?
Sorry for the slightly noobish questions but better to ask
-
Red Eye
- Cylon Empire VIP & BYC.net Gallery Admin
- Posts: 4837
- Joined: Sat May 20, 2006 10:11 am
- Location: Germany
Re: Armour build
Good work so far!
Have look here of how to trim the backpack: http://www.byyourcommand.net/cylongalle ... ?album=294
Have look here of how to trim the backpack: http://www.byyourcommand.net/cylongalle ... ?album=294
"There can be no survivors. So long as one human remains alive the Alliance is threatened."
-
Luke1978
- Patrol Leader
- Posts: 60
- Joined: Mon Aug 05, 2013 10:32 am
- Location: Cottingham, East Yorkshire
Re: Armour build
Trimmed the helmet down some more its fitting better now but still unsure on how much to take off the grill. Tried it on too and I see now what people mean about it nipping on the ears. Guess I will have to trim more off the rim.
- Attachments
-
-
-
-
Red Eye
- Cylon Empire VIP & BYC.net Gallery Admin
- Posts: 4837
- Joined: Sat May 20, 2006 10:11 am
- Location: Germany
Re: Armour build
Again, great work on the trimming!
It's coming together...
It's coming together...
"There can be no survivors. So long as one human remains alive the Alliance is threatened."
-
Jenne

- Flight Leader
- Posts: 375
- Joined: Fri Dec 03, 2010 5:52 pm
- Location: Essen /Germany
Re: Armour build
Great work so far :-)
-
rustycylon
- Squadron Leader
- Posts: 583
- Joined: Sun Apr 29, 2012 7:35 am
- Location: West Midlands UK
Re: Armour build
your doing a great job. 
Its always seems to be cold and wet it the UK especially when you need to work outside
Its always seems to be cold and wet it the UK especially when you need to work outside
-
Luke1978
- Patrol Leader
- Posts: 60
- Joined: Mon Aug 05, 2013 10:32 am
- Location: Cottingham, East Yorkshire
Re: Armour build
Little more work. Trimmed down the gauntlets (little more to do on them before gluing) The right one seems very tight compared to the left. Finished the chest piece, started the biceps and did some more on the helmet.
should I be trimming the helmet back to the pencil line where the arrows are pointing?
Also should I be using this part or is it optional?
Lastly what size slit have people cut for the sweeping leds? Should it be the same size as the leds or smaller?
Ta
Also should I be using this part or is it optional?
Ta
-
Luke1978
- Patrol Leader
- Posts: 60
- Joined: Mon Aug 05, 2013 10:32 am
- Location: Cottingham, East Yorkshire
Re: Armour build
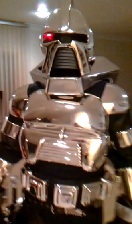
Couple more pics - not getting much time to work on it at the moment got a potential big job on at work. Making a 'Moth' Bi-plane hmmm should be fun. Anyway - trimmed the backpack down and tried a test fit, still a few areas that need tweaking. Tried the gauntlets on as well - like I said the right one has a lot more room at the bottom cuff area than the left. Hoping this is covered by the gloves (which are winging their way to me from Jenne). Hope to get more done over the weekend.
-
Omega Red
- Phalanx Leader
- Posts: 118
- Joined: Wed Jun 05, 2013 11:19 pm
Re: Armour build
I think once you have the undersuite sleeve worn underneath the gauntlet, it won't be as loose.
-
Omega Red
- Phalanx Leader
- Posts: 118
- Joined: Wed Jun 05, 2013 11:19 pm
Re: Armour build
- you can also line the inside of the gauntlet with some thin foam padding to narrow the inside of it. Mine has it.
-
Cylon-Knight

- Site Administrator
- Posts: 6432
- Joined: Wed Jul 23, 2008 9:32 pm
- Location: Kansas City
- Contact:
Re: Armour build
Awesome, Luke1978! Thanks for sharing the pics. 
"All Baseships are now in range to attack the Colonies."

-
Luke1978
- Patrol Leader
- Posts: 60
- Joined: Mon Aug 05, 2013 10:32 am
- Location: Cottingham, East Yorkshire
Re: Armour build
Not being feeling well last week so haven't managed to get much done but here's a couple more update pics.
Got my gloves Not too sure how far to trim bits back to.
Also been gluing the back pack and helmet together. Used some screws to hold the backpack sections together while I added some tabs. Only problem is it looks like there will be a large gap where the two toilet seat sections meet at the back (will take a pic later) guess I will have to fill it or bridge it if necessary.
Got my gloves
-
Hand-Schaub
- First Centurion
- Posts: 756
- Joined: Mon Dec 29, 2008 9:05 am
- Location: Sacramento, CA
Re: Armour build
Great progress. You almost take as many photos as Cylon-Knight!
Who is online
Users browsing this forum: No registered users and 1 guest