Page 5 of 10
Re: DIY Rotocasting
Posted: Wed Aug 03, 2011 11:20 pm
by Big Al
 Ivar / Hellboy Matrix Mold 2
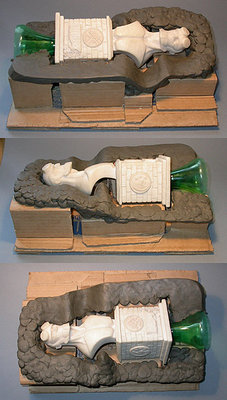
 Mold making 1 - cryptic cardboard base:
[attachment=4]hellboymold027uw.jpg[/attachment]
[attachment=3]hellboymold038jt.jpg[/attachment]
[attachment=2]hellboymold046ps.jpg[/attachment]
[attachment=1]hellboymold059ui.jpg[/attachment]
[attachment=0]hellboymold064zu.jpg[/attachment]
More to come
Re: DIY Rotocasting
Posted: Thu Aug 04, 2011 7:54 am
by Big Al
 Ivar / Hellboy Matrix Mold 3
 Mold making 2 - preparations for the first plaster side.
I used Russian made plastiline (I will call it clay here), but the water based clay could be better.
The first thing to do is to define the plane which separates the two mold sides. I'm not very precise here, as this clay I'm sculpting now will define the exact plane which will separate the two plaster molds. It's important to get it almost right, but there is no point to overwork on it, as the time to define the real (silicone) mold will come later.
The clay won't even touch the sculpt. In fact, I used cling film to cover the sculpt most of the time it's covered with clay - this way I will have much less clean-up to do later.
So, this is the clay what simulates the second half of the mold:

 The next step is to use some more clay and to cover up the whole sculpt. This clay will be replaced with silicone later, it will become the one half of the silicone mold. So, the layer of clay should be not very thin and also not very thick. I think I used maybe too much clay here, could've got away with less silicone later...
Note the cling film and also various details which will later help to synchronize the plaster mold's sides together (round sockets) and also silicone mold and it's plaster cover (called mother mold).
It all will make sense later...
[attachment=2]hellboymold085mo.jpg[/attachment]
[attachment=1]hellboymold106te.jpg[/attachment]
Keys added
[attachment=0]hellboymold115oo.jpg[/attachment]
More to come
Re: DIY Rotocasting
Posted: Thu Aug 04, 2011 7:59 am
by Big Al
 Ivar / Hellboy Matrix Mold 4
 Mold making 3 - first plaster side.
There is fabric inside the plaster to make it a little bit stronger:
[attachment=3]hellboymold120lr.jpg[/attachment]
[attachment=2]hellboymold135jw.jpg[/attachment]
[attachment=1]hellboymold144ck.jpg[/attachment]
[attachment=0]hellboymold159zs.jpg[/attachment]
More to come
Re: DIY Rotocasting
Posted: Thu Aug 04, 2011 8:27 am
by Big Al
 Ivar / Hellboy Matrix Mold 5
 Mold making 4 - second clay side.
Mold and sculpt after removing from the cardboard base:
[attachment=2]hellboymold167gs.jpg[/attachment]
[attachment=1]hellboymold181wp.jpg[/attachment]
 Finished side 2. The paper towel tube will become the hole in the plaster cover to pour silicone in:
[attachment=0]hellboymold190ym.jpg[/attachment]
More to come
Re: DIY Rotocasting
Posted: Thu Aug 04, 2011 9:14 am
by Big Al
 Ivar / Hellboy Matrix Mold 8
 It was funny to read that my tutorial is more complicated than what they teach in American college...
When I decided that I want to try this process, I searched, read and watched as many mold making tutorials as I could find. As I don't have the exact same materials here, I tried (like some sort of MacGyver) to synthesize my own version. I bet not many people use Sprite bottle in mold making...
Basically there are two ways of making silicone molds - box mold and matrix mold. On box mold making sculpture is basically surrounded with some sort of border or box, lower half is sinked into clay and silicone is poured over it all. Then flip over, some clean-up, a little bit vaseline and another silicone pour. Box mold is much quicker and easier to make but it takes much more silicone. As much as I can tell, it's ok for smaller details like hands but is not as good and stable for bigger sculpts as matrix mold, where plaster cover
 Mold making 7 - first silicone side
Silicone I used is white, two component 1:20.
[attachment=4]hellboysilicone073bc.jpg[/attachment]
 Note the small hole inside the plaster on the next photograph - I drilled it so the air had another place to come out of the mold. When I saw the silicone coming through it, I knew this part of the mold is filled with silicone.
[attachment=3]hellboysilicone084xi.jpg[/attachment]
 On the next day:
[attachment=2]hellboysilicone091vr.jpg[/attachment]
[attachment=1]hellboysilicone107vf.jpg[/attachment]
 After some clean-up, one side of the mold is ready!
[attachment=0]hellboysilicone116bg.jpg[/attachment]
Stay Tuned for more!
Re: DIY Rotocasting
Posted: Thu Aug 04, 2011 9:39 am
by Big Al
 Ivar / Hellboy Matrix Mold 10
 Mold making 9 - matrix mold is ready.
[attachment=3]hellboysilicone135ix.jpg[/attachment]
[attachment=2]hellboysilicone143dr.jpg[/attachment]
[attachment=1]hellboysilicone157wt.jpg[/attachment]
[attachment=0]hellboysilicone166lm.jpg[/attachment]
More to come! 
Re: DIY Rotocasting
Posted: Thu Aug 04, 2011 9:44 am
by Big Al
 Ivar / Hellboy Matrix Mold 11
 Mold making 10 - the diagram.
When I was posting my sculpting and mold making progress pictures on Hellboy board, I had hard time to explain to one board member how there will be no cling film marks on the casts. So I drew the next diagram:
[attachment=0]skeem5on.jpg[/attachment]
More to come! 
Re: DIY Rotocasting
Posted: Thu Aug 04, 2011 10:03 am
by Big Al
 Ivar / Hellboy Matrix Mold 13
 It took me several months to work on it, I made it on my spare time. In fact, I think base took more time than actual bust...
I paid way too much for the silicone. Other stuff was relatively cheap.
 What to do:
Look at the post "Ivar / Hellboy Matrix Mold #11", there is a diagram of what the mold making steps are.
 1: make a sculpt
I used polymer clay named Cernit, most people use Super Sculpey, waxes and sometimes additional materials like metal for some details.
 2: make a mold to take several copies of the sculpt.
I used materials I could get, instead of cardboard one can use whatever materials, foamcore, clay, whatever is easier and quicker. And instead of plastiline some water based clay.
 3:The reason I made matrix mould where plaster surrounds silicone is simple - silicone is expensive and soft, so plaster helps to save materials and hold the form.
Be right back! 
Re: DIY Rotocasting
Posted: Thu Aug 04, 2011 10:08 am
by Big Al
 Ivar / Hellboy Matrix Mold 15
 And - at last, some progress with resin! Now it's time for putty, primer and color...
[attachment=0]hellboycast09cernitplasterresi.jpg[/attachment]
Still More! 
Re: DIY Rotocasting
Posted: Thu Aug 04, 2011 12:40 pm
by Big Al
Re: DIY Rotocasting
Posted: Thu Aug 04, 2011 2:30 pm
by Big Al
 Ivar Hellboy Cast Complete and Painted

